
How I Installed WordPress on a Hetzner CX33 (80 GB) with Docker
When I decided to install WordPress on a VPS for digitalarchitects.hr, managed hosting quoted me between €30 and €80 per month. A Hetzner CX33 costs a fraction of that. The catch: you set it up yourself.
I did the setup in about an hour. The DNS propagation is the only part you wait on. Everything else takes five minutes or less per step. This article is exactly what I did, and why I made each choice along the way.
One thing I decided early: EU-based hosting with guaranteed resource isolation. Shared hosting means your site competes for CPU and RAM with hundreds of others on the same machine. A VPS gives you a guaranteed RAM allocation and isolated storage. You are not competing for resources with an unbounded number of neighbors. Hetzner is a German company with datacenters in Germany and Finland, which means unambiguous EU jurisdiction and no questions on data residency. For a consultancy that advises clients on GDPR-compliant infrastructure, running your own site on US-company hardware would be a strange choice. If you are evaluating this for a production site and want a second opinion on the architecture, reach out.
Why I use Docker Compose to install WordPress on VPS
Most WordPress VPS tutorials walk you through installing Nginx, PHP, and MySQL by hand. You add packages, edit configuration files in /etc/, and remember what you changed when something breaks six months later.
I went with Docker Compose instead, and I think it is the better choice here for three concrete reasons.
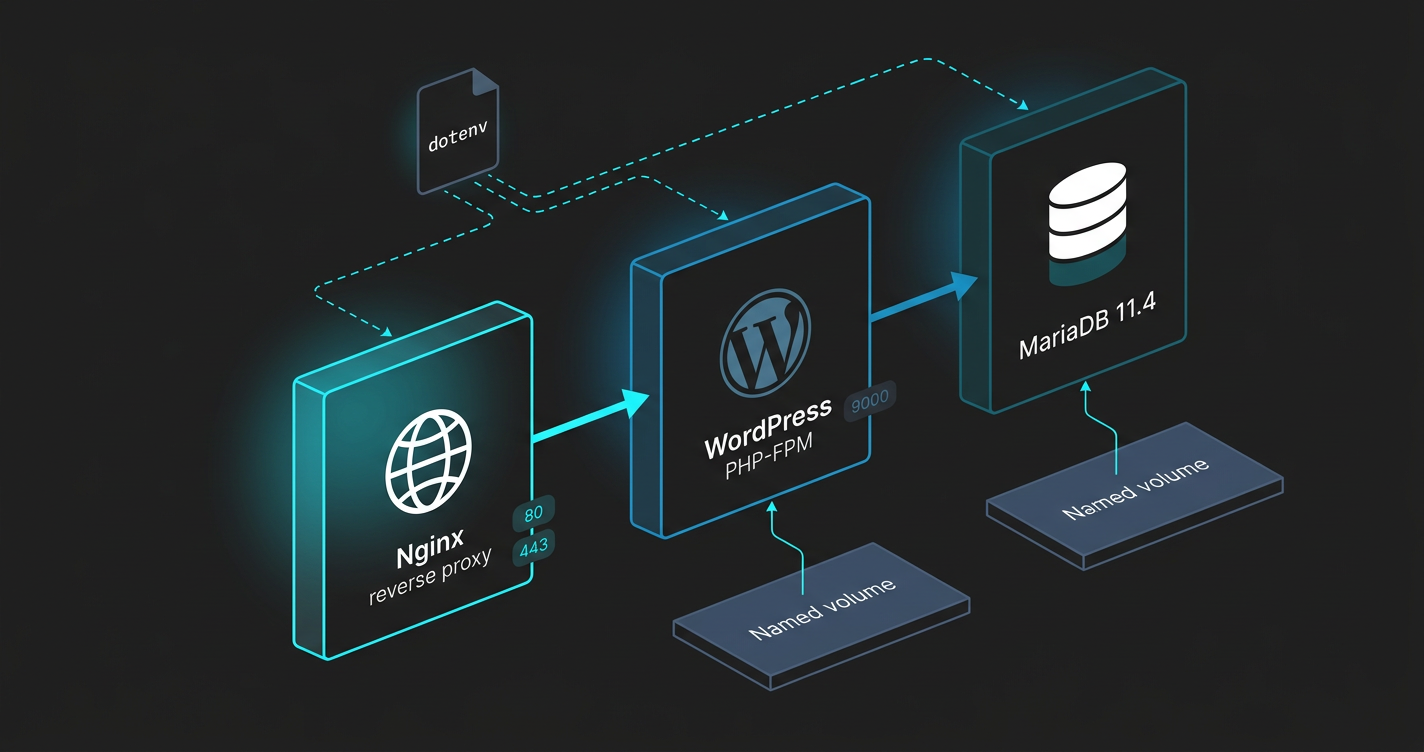
First: each component lives in its own container. Nginx handles HTTP traffic. WordPress PHP-FPM handles PHP execution. MariaDB handles the database. They communicate over a private network that Docker creates. Nothing is exposed to the internet except the web server.
Second: all credentials go in one .env file. Docker Compose reads it automatically and injects each value into the container that needs it. No database password ever ends up hardcoded in a config file, and no config file that contains a password ever risks ending up in git.
Third: the whole stack is two files. Moving to a bigger server, or recreating this setup from scratch, means copying docker-compose.yml and .env to the new machine and running one command.
The architecture in plain terms:
Internet
    |
Nginx (ports 80 / 443)        <- only container exposed to the outside
    |
WordPress PHP-FPM (port 9000) <- internal only
    |
MariaDB (port 3306)           <- internal only

Named volumes:
  wordpress:/var/www/html     <- WordPress files, shared between app and Nginx
  dbdata:/var/lib/mysql       <- database files

Config files on host:
  .env                        <- all secrets, never committed to git
  docker-compose.yml          <- service definitions
  nginx.conf                  <- Nginx server block
Here is what each piece is and why I picked that version:
- Ubuntu 24.04 LTS on Hetzner CX33 (4 vCPU, 8GB RAM, 80GB SSD). Docker CE installs cleanly here.
- MariaDB 11.4: fully WordPress-compatible, lighter than MySQL 8.0, LTS support until February 2028.
- wordpress:php8.3-fpm: the official WordPress Docker image with PHP 8.3 and PHP-FPM. The FPM variant works with Nginx. The
-apachetag bundles Apache instead; do not use it here. - nginx:alpine: minimal Nginx image, around 5-20MB in memory.
Total memory for the stack: between 200 and 470MB. On an 8GB VPS, that leaves plenty of headroom.
Securing the server first
Here is how I set this up. You need three things before you start: a Hetzner CX33 with Ubuntu 24.04 LTS selected, a domain with its A record pointing at the server IP, and SSH access as root. Hetzner lets you paste your SSH public key in the server creation form, so your first root login already uses key authentication. If you have a key at ~/.ssh/id_ed25519.pub, add it there and skip the ssh-copy-id step for root below.
Do not skip the security steps. A VPS with password-based root SSH access gets probed by automated scanners within minutes of going live.
Log in as root:
ssh root@YOUR_SERVER_IP
Update packages, create a non-root user, and enable the firewall:
apt update && apt upgrade -y

adduser deploy
usermod -aG sudo deploy

ufw allow OpenSSH
ufw allow 80
ufw allow 443
ufw --force enable
Generate an Ed25519 key pair if you do not already have one, then copy the public key to the deploy user:
ssh-keygen -t ed25519 -C "your@email.com"
ssh-copy-id -i ~/.ssh/id_ed25519.pub deploy@YOUR_SERVER_IP
Ed25519 is the current recommended key algorithm. It is shorter and faster than RSA with no known weaknesses.
Back on the server as root, disable password authentication:
nano /etc/ssh/sshd_config
Find PasswordAuthentication and set it to no. Then:
systemctl restart ssh.service
Log out and log back in as deploy using your key. Confirm it works before continuing. If you lose SSH access now, you will need Hetzner’s web console to get back in.
Install Docker
Docker’s install script handles everything, including the Compose plugin:
curl -fsSL https://get.docker.com | sh
sudo usermod -aG docker deploy
Log out and log back in. Then verify:
docker compose version
Note the space: docker compose (V2) is bundled with Docker CE. Most older tutorials still show docker-compose with a hyphen; that is V1 and deprecated.
The configuration files
Log in as deploy and create the project directory:
mkdir ~/wordpress && cd ~/wordpress
.env
Create this file first. All credentials belong here:
DB_NAME=wordpress_db
DB_USER=wp_user
DB_PASSWORD=replace_with_a_strong_password
DB_ROOT_PASSWORD=replace_with_another_strong_password
DOMAIN=yourdomain.com
Save it as .env in ~/wordpress/. If you use git for anything in this directory: echo ".env" >> .gitignore
Docker Compose reads .env automatically when you run any docker compose command. You write ${DB_PASSWORD} in docker-compose.yml, and Compose substitutes the actual value from .env at runtime. Nothing sensitive ever appears in a file you might share or commit.
docker-compose.yml
services:
  db:
    image: mariadb:11.4
    restart: always
    environment:
      MYSQL_ROOT_PASSWORD: ${DB_ROOT_PASSWORD}
      MYSQL_DATABASE: ${DB_NAME}
      MYSQL_USER: ${DB_USER}
      MYSQL_PASSWORD: ${DB_PASSWORD}
    volumes:
      - dbdata:/var/lib/mysql

  wordpress:
    image: wordpress:php8.3-fpm
    restart: always
    depends_on:
      - db
    environment:
      WORDPRESS_DB_HOST: db
      WORDPRESS_DB_NAME: ${DB_NAME}
      WORDPRESS_DB_USER: ${DB_USER}
      WORDPRESS_DB_PASSWORD: ${DB_PASSWORD}
    volumes:
      - wordpress:/var/www/html

  nginx:
    image: nginx:alpine
    restart: always
    ports:
      - "80:80"
      - "443:443"
    volumes:
      - wordpress:/var/www/html:ro
      - ./nginx.conf:/etc/nginx/conf.d/default.conf:ro
      - /etc/letsencrypt:/etc/letsencrypt:ro
    depends_on:
      - wordpress

volumes:
  dbdata:
  wordpress:
The depends_on directives set the startup order: database first, then WordPress, then Nginx. Nginx mounts WordPress files as read-only (:ro) because it serves them and has no reason to write them. Both dbdata and wordpress are named volumes, managed by Docker directly. This sidesteps the file permission mismatches you get with bind mounts.
nginx.conf
Start with HTTP only. You will add HTTPS after getting the certificate:
server {
    listen 80;
    server_name yourdomain.com;
    root /var/www/html;
    index index.php;

    location / {
        try_files $uri $uri/ /index.php?$args;
    }

    location ~ \.php$ {
        fastcgi_pass wordpress:9000;
        fastcgi_param SCRIPT_FILENAME $document_root$fastcgi_script_name;
        include fastcgi_params;
    }

    location ~* \.(jpg|jpeg|png|gif|css|js|ico|webp|svg)$ {
        expires 365d;
    }
}
Replace yourdomain.com with your actual domain. The fastcgi_pass wordpress:9000 line is how Nginx talks to the WordPress container. Inside the Docker network, wordpress resolves to that container’s internal IP.
Start the stack
docker compose up -d
docker compose ps
All three containers should show running. MariaDB takes a few extra seconds on the first start to initialize. If WordPress shows a restart or two before settling, that is normal. restart: always handles it automatically.
Visit http://yourdomain.com to confirm Nginx is serving. You should see the WordPress installer page.
SSL with Certbot
Install Certbot on the host, then stop Nginx to free port 80 for the domain verification:
sudo apt install certbot -y
docker compose stop nginx
Run Certbot in standalone mode. It starts a temporary HTTP server on port 80, completes the Let’s Encrypt challenge, and saves the certificate to /etc/letsencrypt/live/yourdomain.com/:
sudo certbot certonly --standalone \
  -d yourdomain.com \
  --email your@email.com \
  --agree-tos \
  --non-interactive
The docker-compose.yml already mounts /etc/letsencrypt into the Nginx container as read-only, so Nginx can read the certificate without any file copying.
Update nginx.conf with the HTTPS server block and an HTTP redirect:
server {
    listen 80;
    server_name yourdomain.com;
    return 301 https://$server_name$request_uri;
}

server {
    listen 443 ssl;
    server_name yourdomain.com;
    root /var/www/html;
    index index.php;

    ssl_certificate /etc/letsencrypt/live/yourdomain.com/fullchain.pem;
    ssl_certificate_key /etc/letsencrypt/live/yourdomain.com/privkey.pem;
    ssl_protocols TLSv1.2 TLSv1.3;

    location / {
        try_files $uri $uri/ /index.php?$args;
    }

    location ~ \.php$ {
        fastcgi_pass wordpress:9000;
        fastcgi_param SCRIPT_FILENAME $document_root$fastcgi_script_name;
        include fastcgi_params;
    }

    location ~* \.(jpg|jpeg|png|gif|css|js|ico|webp|svg)$ {
        expires 365d;
    }
}
Bring Nginx back up:
docker compose start nginx
Let’s Encrypt certificates expire after 90 days. The cron below runs at 3am daily, stops Nginx briefly for the renewal challenge, and starts it again:
(crontab -l 2>/dev/null; echo "0 3 * * * cd ~/wordpress && sudo certbot renew --pre-hook 'docker compose stop nginx' --post-hook 'docker compose start nginx' --quiet") | crontab -
Open https://yourdomain.com. The WordPress installer loads over HTTPS. Fill in your site title, admin username, and password. Done.
What this gets you
The thing I appreciate most about this setup is how portable it is. The entire configuration is two files. When I wanted to test a change to the Nginx config, I edited nginx.conf and ran docker compose restart nginx. No package manager involved, no systemd service files to hunt down.
Migrating to a larger VPS: install Docker, copy .env and docker-compose.yml, restore the named volumes from a backup, run docker compose up -d. Under 30 minutes excluding the backup restore.
The backup command I run for WordPress files:
docker run --rm -v wordpress:/data -v $(pwd):/backup alpine \
  tar czf /backup/wordpress-$(date +%Y%m%d).tar.gz -C /data .
Same pattern for dbdata. Two archives, both under 50MB for a fresh site, grow with your content.
This is the exact stack running digitalarchitects.hr right now. If you are setting up something similar for a client project and want to talk through the specifics before committing to a setup, reach out.
Frequently Asked Questions
How do I install WordPress on a VPS step by step on Ubuntu?
Provision an Ubuntu 24.04 LTS VPS, create a non-root user, enable UFW with ports 22, 80, and 443, install Docker CE, write a docker-compose.yml with Nginx, WordPress PHP-FPM, and MariaDB services, store all credentials in a .env file, run certbot to get an SSL certificate, then start the stack with docker compose up -d. The whole process takes about an hour; DNS propagation is the only wait.
Can I run WordPress on a Hetzner CX33 with Docker?
Yes. A Hetzner CX33 (4 vCPU, 8GB RAM, 80GB SSD) runs the full WordPress Docker Compose stack — Nginx, WordPress PHP-FPM, and MariaDB — using between 200 and 470MB of RAM, leaving plenty of headroom. Hetzner datacenters are in Germany and Finland, so data stays in EU jurisdiction throughout.
How do I set up Docker Compose with WordPress, Nginx, and SSL on a VPS?
Define three services in docker-compose.yml: nginx:alpine on ports 80 and 443, wordpress:php8.3-fpm on the internal network only, and mariadb:11.4 on the internal network only. Mount an nginx.conf that proxies PHP requests to the WordPress container via fastcgi_pass. Run certbot to obtain a Let’s Encrypt certificate, mount /etc/letsencrypt into the Nginx container, and reference the fullchain.pem and privkey.pem paths in your nginx.conf ssl_certificate directives.
Is self-hosted WordPress cheaper than managed hosting?
Significantly cheaper for a small site. Managed WordPress hosting typically costs €30 to €80 per month. A Hetzner CX33 VPS costs a fraction of that and gives you isolated CPU and RAM — you are not sharing resources with other tenants. The trade-off is setup time: about an hour for the initial Docker Compose configuration, and occasional maintenance when packages or images need updating.
How do I set WordPress URL with environment variables instead of editing wp-config.php?
Add WP_HOME and WP_SITEURL as PHP constants directly in wp-config.php before the ‘stop editing’ line: define(‘WP_HOME’, ‘https://yourdomain.com’); define(‘WP_SITEURL’, ‘https://yourdomain.com’);. This overrides whatever URL is stored in the database and fixes redirect loops or IP-instead-of-domain issues after a fresh install. All database credentials in the Docker Compose setup are injected via a .env file — Docker Compose reads it automatically and passes each value into the container that needs it.