
How I Build WordPress Sites with Claude Code Over SSH
When the admin panel runs out of runway
You’ve got a VPS, WordPress is running, the admin panel is open. You can write posts, configure plugins, upload images. That part is fine. But the moment you need to build something, a custom theme, a page template, a contact page that doesn’t look like it came from a drag-and-drop builder, you’re past what the admin panel does.
Most people reach for an SFTP client at this point. FileZilla, Transmit, or whatever their host recommends. You mount the remote directory, navigate to /wp-content/themes/, open a PHP file, make an edit, save, reload the browser. For a single change, that works. For building an actual theme, it’s slow, manual, and completely disconnected from version control.
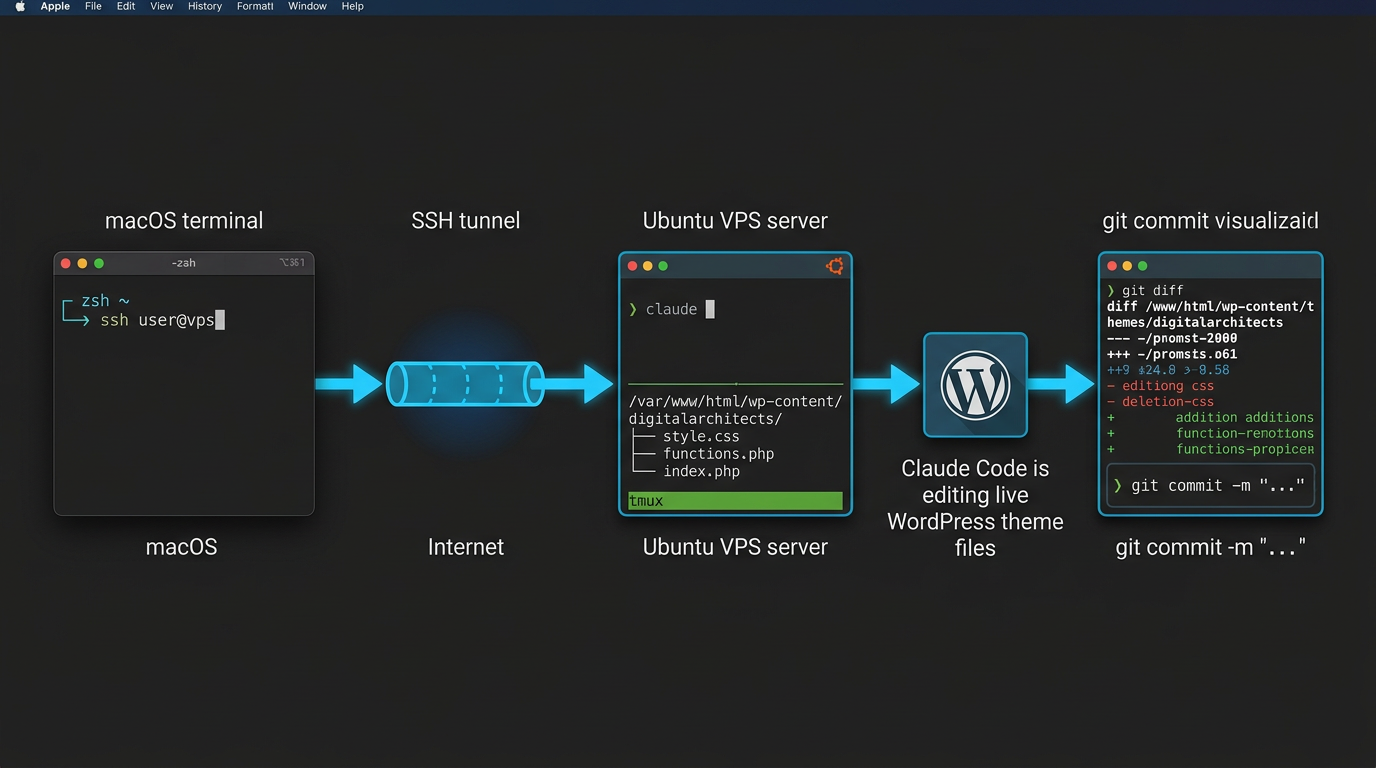
I use a different approach. I SSH into the VPS, run Claude Code in the theme directory, and tell it what to build. Claude Code edits the files directly on the server. I review the diff, commit what looks right, and move to the next component. The whole build lives in git from the first commit.
If you’re setting this up on a Hetzner VPS or any Ubuntu-based server, you can get this running in about 20 minutes. If you need to set up the VPS and WordPress installation first, that walkthrough is here.
Why this beats the alternatives
The WP Admin file editor is the most dangerous option. There’s no undo, no version control, and one PHP syntax error takes the site down. SFTP is safer but entirely manual; every file is a hand edit, and context disappears as soon as you close the connection.
Local development with sync is the most common approach in agency workflows, but it introduces drift. The local environment is never quite the same as production. Database differences, path mismatches, different PHP versions. All of it creates friction between what works on your machine and what runs on the server.
The SSH approach has none of those problems. Claude Code runs on the VPS itself, in the actual filesystem, with the actual PHP version and directory structure. Every change is testable immediately by reloading the browser. Every change is one git diff away from being reviewed. Claude Code does the file work; I describe what to build.
Setting up Claude Code on the VPS
Here’s how I set this up. You can replicate it on any Ubuntu 22.04 or 24.04 VPS with root or sudo access.
Confirm SSH with key-based auth
If you’re still logging in with a password, add your key first. From your Mac:
ssh-copy-id user@your-vps-ip
Test it:
ssh user@your-vps-ip
You should land in the server shell without a password prompt. This matters because you’ll be reconnecting frequently.
Install Node.js
Claude Code is a Node.js package. On Ubuntu 24.04 the default repos ship Node 18, which is sufficient:
sudo apt update && sudo apt install -y nodejs npm
Verify with node --version; you want v18 or higher.
Install Claude Code
sudo npm install -g @anthropic-ai/claude-code
Set your API key
Add the Anthropic API key to the server’s shell config so it persists across sessions:
echo 'export ANTHROPIC_API_KEY="sk-ant-your-key-here"' >> ~/.bashrc
source ~/.bashrc
If the VPS shell is zsh, change ~/.bashrc to ~/.zshrc.
Start a tmux session
A plain SSH connection drops when your local machine sleeps or the network hiccups. tmux keeps the server-side session alive. Run these on the server once you’re SSH’d in:
sudo apt install -y tmux
tmux new-session -s wp-build
If your SSH connection drops later, SSH back in and run:
tmux attach -t wp-build
You’ll find Claude Code exactly where you left it.
Navigate to the theme directory
WordPress themes live at /var/www/html/wp-content/themes/ on a standard Ubuntu Apache install. If that’s your stack, navigate directly to the theme directory and skip ahead to “Initialize git.”
If your stack uses Docker Compose (as in the Hetzner guide), WordPress files live inside a named Docker volume and aren’t directly accessible from the host filesystem. Claude Code can’t edit what it can’t see. The fix is to add a bind mount for wp-content so it lives on the host as a real directory.
Step 1: Copy wp-content out of the running container
Do this before changing anything in docker-compose.yml, while the container is still running and the files are intact:
docker cp wordpress-wordpress-1:/var/www/html/wp-content ~/wordpress/
This copies the entire wp-content directory (themes, plugins, uploads) to ~/wordpress/wp-content on the host. Verify it landed:
ls ~/wordpress/wp-content/themes/
You should see your active theme directory listed.
Step 2: Add the bind mount to docker-compose.yml
Open your compose file:
vi ~/wordpress/docker-compose.yml
The bind mount needs to be added to both the wordpress service and the nginx service. PHP-FPM reads theme files for rendering; nginx serves CSS, JS, and images as static files directly. If only one service has the bind mount, the other keeps reading the named volume and changes won’t show up.
services:
  wordpress:
    volumes:
      - wordpress:/var/www/html
      - ./wp-content:/var/www/html/wp-content

  nginx:
    volumes:
      - wordpress:/var/www/html:ro
      - ./wp-content:/var/www/html/wp-content:ro
      - ./nginx.conf:/etc/nginx/conf.d/default.conf:ro
      - /etc/letsencrypt:/etc/letsencrypt:ro
Keep all other lines in each service unchanged; only add the ./wp-content line to both.
Step 3: Restart the stack
cd ~/wordpress
docker compose down && docker compose up -d
Step 4: Verify
Check what the host sees:
ls ~/wordpress/wp-content/themes/
Then check what the container sees:
docker exec wordpress-wordpress-1 ls /var/www/html/wp-content/themes/
Both lists must be identical. If they differ, the bind mount is not serving correctly; the named volume is still winning for that path. This usually means docker compose down && docker compose up -d wasn’t run after editing docker-compose.yml, or the container name differs from wordpress-wordpress-1 (check with docker ps).
Do not create theme files until both outputs match. If you create files while the bind mount is not active, they land inside the named volume and disappear the next time the container restarts with the bind mount in place.
Step 5: Fix upload permissions
The bind mount creates wp-content owned by your server user. WordPress PHP-FPM runs as www-data (UID 33) inside the container and needs write access to the uploads directory. Without it, file uploads, media library, and plugin installs fail with a 500 error.
Only chown uploads, not all of wp-content. Theme files must stay owned by your server user so Claude Code can edit them directly. If you chown everything and lose write access to the theme directory, restore it with:
sudo chown -R $USER:$USER ~/wordpress/wp-content/themes
$USER resolves to your current login: deploy, ubuntu, or whatever your server user is. No need to type the username manually.
mkdir -p ~/wordpress/wp-content/uploads
sudo chown -R 33:33 ~/wordpress/wp-content/uploads
UID 33 is www-data inside the container. Using the numeric ID works even if your host system doesn’t have a www-data user defined.
Navigate to your theme:
cd ~/wordpress/wp-content/themes/your-theme-name
If you’re starting fresh, create the directory and the two files WordPress requires to recognize a theme:
mkdir ~/wordpress/wp-content/themes/my-theme
cd ~/wordpress/wp-content/themes/my-theme
Create style.css with the theme header comment. WordPress reads this to display the theme in WP Admin:
vi style.css
Paste this, then save and quit (:wq):
/*
Theme Name: My Theme
Author: Digital Architects
Version: 1.0
*/
Create a minimal index.php:
vi index.php
Paste this, then save and quit (:wq):
<?php get_header(); ?>
<main><?php if (have_posts()) : while (have_posts()) : the_post(); the_content(); endwhile; endif; ?></main>
<?php get_footer(); ?>
Go to WP Admin -> Appearance -> Themes. Your theme will appear. Activate it. From this point, Claude Code builds everything else.
Initialize git
On a fresh server, git doesn’t know who you are. Set your identity once before the first commit. This applies globally to all repos on the server:
git config --global user.email "you@example.com"
git config --global user.name "Your Name"
Then initialize the repo:
git init
git add .
git commit -m "initial state"
Every change Claude makes shows up in git diff before you commit it.
Write a CLAUDE.md in the theme root
Most tutorials skip this step. A CLAUDE.md file in the current directory loads automatically when you launch Claude Code, and it’s what separates generic PHP output from output that actually fits your site. Specific beats vague every time here.
Create it:
vi CLAUDE.md
Write something like this, adjusted to match your actual setup:
# Site context

Theme: my-theme
WordPress root: /var/www/html/
PHP version: 8.2
Brand colors: #00BFFF (primary), #232323 (dark background), #FFFFFF (text on dark)
Font: Roboto (self-hosted, no Google Fonts CDN)

## What's built so far
- functions.php: theme setup, enqueue scripts and styles
- header.php: site header with navigation
- footer.php: footer with copyright and links

## Code rules
- No inline styles; use style.css or wp_enqueue_style()
- All custom post types go in functions.php
- Page templates use the naming convention page-{slug}.php
The more detail you put in, the less you have to repeat yourself in every conversation. Update it as you build.
Directing Claude Code to build WordPress components
With the tmux session running and CLAUDE.md in place, launch Claude from inside the theme directory:
claude
Claude reads CLAUDE.md, scans the file tree, and waits.
Building a contact page template
“Create a contact page template. Name it page-contact.php and register it using the standard WordPress template header comment. The page should have an H1 heading, a short introductory paragraph, a placeholder div with class
contact-form-wrapper, and a closing line. No inline styles.”
Claude creates page-contact.php with the correct template header and updates functions.php if needed. To assign the template to a page, go to WP Admin, edit the Contact page, and select it from the Page Attributes dropdown. That step stays in the UI because template assignment is a database record, not a file.
Adding a custom post type
“Add a Projects custom post type to functions.php. Supports: title, editor, thumbnail, excerpt. Labels: plural Projects, singular Project. Public, show in menu, permalink base projects.”
Claude adds the register_post_type() call to functions.php and saves.
CSS changes
“In style.css, style the site header: background #232323, link color #00BFFF, hover state #0099CC. Font Roboto with sans-serif fallback. Header height 64px, horizontal link spacing 24px.”
Claude edits style.css directly. Reload the browser to see the change.
The review loop
git diff
Read the diff before accepting anything. If it looks right:
git add .
git commit -m "add contact page template"
If something is off, tell Claude what to fix before committing. Never commit without reading the diff.
Changes not showing in the browser
If git diff shows the change but the browser still renders the old version, check two things in order.
First, confirm the container actually sees the edited file. Replace your-theme with your actual theme directory name, the same name you used when running mkdir earlier:
docker exec wordpress-wordpress-1 cat /var/www/html/wp-content/themes/your-theme/style.css
If the output is old content, the bind mount is not working; the container is still reading from the named volume. Go back through the bind mount steps and confirm the host and container ls output matches before editing any more files.
If the output is new content, it is a browser cache issue. Hard refresh: Cmd+Shift+R on Mac, Ctrl+Shift+R on Windows/Linux. A normal reload serves the cached CSS and will not pick up the change.
When Claude gets something wrong
It will happen. Claude will write PHP that’s syntactically valid but does the wrong thing, or style something in a way that doesn’t match the design. The fix is to stay in the conversation rather than editing the file by hand.
Tell Claude exactly what’s wrong: “The template header comment is missing the Template Name line, so WordPress doesn’t recognize it as a template.” Or: “The header background isn’t applying on mobile; the media query needs to be inside the existing @media block.”
If Claude produces something genuinely broken and you haven’t committed it yet, discard the changes cleanly:
git checkout -- .
That resets everything to the last commit. Start the prompt over with more detail. I’ve found that giving Claude a one-sentence description of what failed, plus the expected behavior, gets a correct result on the second attempt most of the time.
WP Admin versus Claude Code
| Do in WP Admin | Do with Claude Code |
|---|---|
| Activate the custom theme | Build theme PHP files |
| Install and configure plugins | functions.php additions |
| Upload images and media | CSS and JS styling |
| Write page and post content | Page template structure |
| Set up menus and widgets | Custom post types |
| Configure permalink settings | Shortcodes and template logic |
If it belongs in version control, use Claude Code. If it’s content or a database setting, use WP Admin.
What the build looks like session to session
The pattern I use at the start of every session:
- From my Mac:
ssh user@vps-ip - On the VPS:
tmux attach -t wp-build cd /var/www/html/wp-content/themes/my-themeclaude- Describe the next component
- Read
git diff, ask Claude to fix anything that looks off git add . && git commit -m "describe what changed"- Repeat
The build becomes a git log, not a click history. If the site breaks after a session, git log shows which commit caused it. git revert gets you back. This is what you lose with SFTP or the WP Admin editor: the ability to undo at any granularity, with complete confidence about what changed.
Each component is a conversation, and each conversation ends in a commit. What’s been built isn’t something you have to remember; it’s in the log.
One step further: adding staging
This workflow runs directly against production theme files. It’s safe when you read every git diff before committing, but the cleaner setup is a staging WordPress install on the same VPS pointed at the same database. You break things on staging; nothing touches prod until a promote script passes a PHP syntax check and a smoke test. That extra layer is what I’d recommend once the site has real traffic. I’ll cover the full setup in the next article.
If this is the workflow you want for your build, get in touch and I’ll walk you through the setup.
Frequently Asked Questions
How do I use Claude Code on a remote VPS to build WordPress?
SSH into the VPS, install Node.js and Claude Code via npm, add your Anthropic API key to the shell config, and start a tmux session to keep the process alive across disconnects. Navigate to the WordPress theme directory and run claude. Claude Code reads the file tree and edits theme files directly on the server. Every change is reviewable with git diff before you commit.
Can I build a custom WordPress theme from the terminal using Claude AI?
Yes. Run Claude Code inside the theme directory on the VPS and describe the component you want in plain language: a page template, a custom post type, CSS changes. Claude edits the PHP and CSS files directly. A CLAUDE.md file in the theme root tells Claude your brand colors, PHP version, and what is already built, so every output fits the site without repeating context each session.
How does Claude Code work with WordPress files on a remote server over SSH?
You SSH into the VPS yourself and run Claude Code directly in the server shell inside the theme directory. Claude Code reads and writes files locally from its perspective; the files just happen to live on the VPS. If the WordPress stack uses Docker Compose, a bind mount is required so the theme directory is accessible on the host filesystem rather than locked inside a named Docker volume.
What is a better WordPress development workflow than SFTP?
SSH into the VPS, run Claude Code in the theme directory inside a tmux session, and describe what to build in plain language. Claude edits the files directly on the server. Review every change with git diff, commit what is correct, and reload the browser. This approach keeps the entire build in version control from the first file, runs against the real PHP version and directory structure, and removes the manual file-by-file editing that SFTP requires.
How do I build a WordPress theme from the terminal with AI assistance on a VPS?
Install Claude Code on the VPS with npm install -g @anthropic-ai/claude-code and set ANTHROPIC_API_KEY in the shell config. Write a CLAUDE.md in the theme root with your brand context and a list of files already built. Run claude from the theme directory and describe each component: page templates, custom post types, header styles. Claude writes the PHP and CSS. Use git diff to review each change before committing.